Tel./WhatsApp:
+86 15266206885
E-mail:
[email protected]


Avoid your inquiry is delay response, please enter your WhatsApp/Skype along with the message, so we can contact you at the very first time.
We will reply you within 24 hours. If for urgent case, please add WhatsApp/WeChat: ,. Or call directly.
I often see confusion about automatic banders. People wonder if they are complicated or simple to operate. I think they are user-friendly.
An automatic bander places a band around a product and secures it with tension and heat or ultrasonic sealing. It saves time, reduces labor, and ensures consistent results. It is an efficient solution for businesses of various sizes.
Many people ask me if an automatic bander is worth the investment. I believe it is, especially for facilities that want to improve productivity. Let’s explore the differences between banding and strapping, understand banding machines, and learn how to use one.
I have heard people mix up the terms. They assume banding and strapping are the same. I see them as similar concepts with slight differences.
Banding uses wider, thinner materials like paper or film. Strapping1 typically uses thicker materials like plastic or steel. The choice depends on the product and the desired tension level.
I want to break this down in more detail. Banding is a process that involves encircling products with a narrow strip of material, often paper or plastic film. These materials are generally gentler on delicate items. Strapping uses thicker, more rigid materials like polypropylene or steel straps. It is suitable for heavier loads. I have observed that many factories opt for strapping when they need to secure bulky cartons or pallets. They use banding when they want a tidy appearance or gentle handling.
I often recommend banding for products that need a clean presentation. It is gentle on surfaces. If someone needs to secure heavier shipments, I suggest strapping. A table may help illustrate these points:
| Aspect | Banding | Strapping |
|---|---|---|
| Material | Paper, thin film | Plastic (PP, PET), steel |
| Appearance | Neat, less bulky | More industrial |
| Tension | Lower | Higher |
| Applications | Bundling brochures, small boxes | Securing heavy loads, pallets |
| Impact on Items | Minimal risk of damage | Can be very tight, stable grip |
Banding is often chosen for smaller groups of items like envelopes, magazines, or small boxes that need to stay together. Strapping is used when heavy loads require strong holding force. Automatic banders are designed for banding materials, while automatic strapping machines handle thicker straps. The difference lies in the tension force, the sealing mechanism, and the durability required. If your operation deals with light to medium loads that need a neat appearance, banding is your solution. If you must handle heavy-duty shipments, strapping is the better fit.
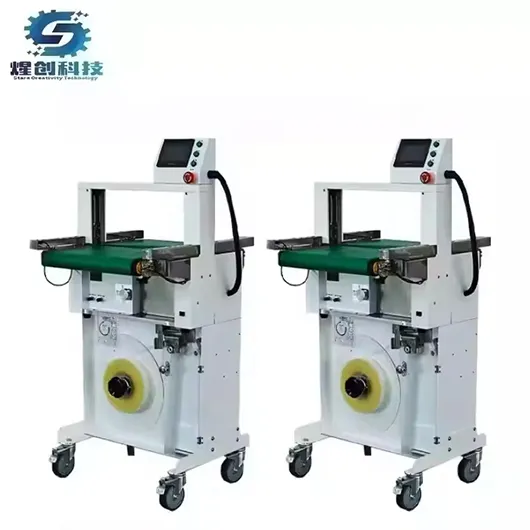
I see many businesses shift from manual bundling to automated banding. A banding machine2 is a device that applies bands around items quickly and consistently. It reduces manual labor and product damage.
A banding machine usually uses paper bands or plastic film. It measures, tightens, and seals the band. It is smaller than most strapping machines, making it good for compact work areas.
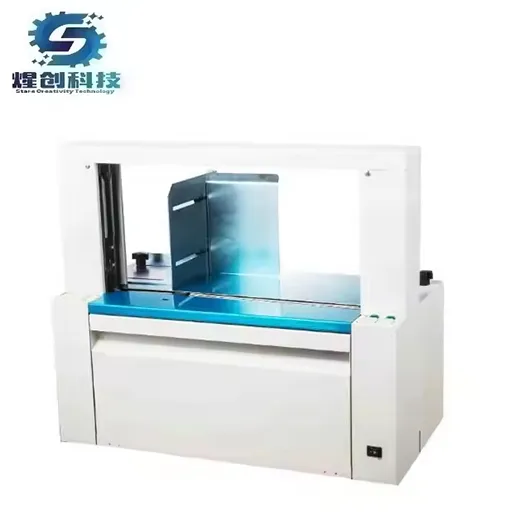
A banding machine works by feeding a banding material from a roll through a guided track. The machine loops this band around the product. Then it tensions and seals the band before cutting the material. I like that the tension is adjustable. This allows gentle bundling for delicate items. It also ensures a secure hold for more robust products.
I have seen how businesses with frequent bundling tasks benefit from these machines. They improve output speed because they reduce manual steps. Operators only need to load the material and place the product in position. The machine handles the rest.
I recall helping a local printing company switch to an automatic banding machine. They needed tidy bundles of brochures and flyers. The switch improved their productivity by 40%. Their staff no longer had to manually tie or tape bundles. Also, the final appearance looked professional. The machine’s gentle tension prevented marks or dents on the brochures. Their feedback was that the machine paid for itself in a few months.
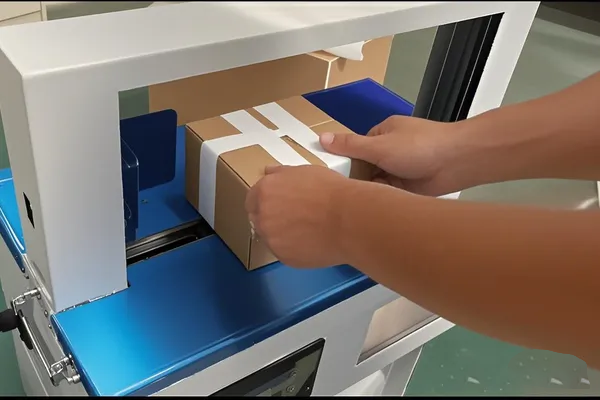
I get asked this question often. People worry about learning curves. I find that using a banding machine is straightforward. You load the band, position the product, and let the machine do the rest.
Place the item under the arch, press the start switch (or let a sensor trigger the cycle), and watch it band the item. It’s quick. It requires minimal training.
I want to share detailed steps to build confidence in those considering an automatic bander or banding machine. The exact procedure may vary slightly by model, but the core steps remain consistent.
I have noticed that many banding machines have user-friendly digital displays. These allow quick tension and temperature changes. Operators can easily fine-tune the machine to handle different product sizes or materials. Because banding machines often have modular designs, it’s simple to integrate them into production lines or pack stations.
I learned that consistent maintenance leads to smooth operation. If the sealing module is clean, the machine rarely has issues. Also, keep an eye on the tension if switching between delicate and sturdy products. A quick adjustment can prevent damage or loose bands. For advanced setups, some machines can track the number of cycles or integrate with a conveyor system. This helps large-scale operations automate even more.
Banding machines are simple yet powerful tools. They help me keep products neat, secure, and well-presented. With the right settings and basic care, they can transform a packaging process.